7.如何将颜色信息存储到纹理中
7.1 知识点
如何将颜色信息存储到纹理中
主要目的
- 将获取到的顶点位置信息(已归一化到
0~1)依次写入一张纹理。 - 落盘并改好导入设置,完成 VAT 贴图资源的生成链路。
主要思路
整体分两段:先在 CPU 上用 Texture2D 把像素写好并落盘,再用 TextureImporter 把这张 PNG 当成数据贴图导入,避免压缩和 sRGB 把数值弄坏。
一、Texture2D:写像素 → 编码 → 写文件
new Texture2D(宽, 高, 格式, 是否 mipmap, 是否线性)- 格式常用
RGBA32,也可用RGBAHalf、RGBAFloat、R8、RG16等。 - VAT 一般不开 mipmap。
- 最后一项为线性时,数据贴图常选
true,减少 sRGB 解码 / 伽马校正带来的二次变换。
- 格式常用
SetPixel(x, y, color):把Color写到指定像素;这里只是把float塞进RGB,不是当美术颜色画。Apply(是否算 mipmap, 是否释放 CPU 像素缓冲):只改像素不Apply,资源视图或后续读回往往对不上。EncodeToPNG():得到字节数组。File.WriteAllBytes(path, bytes):写入磁盘(using System.IO;)。
二、TextureImporter:导入设置
AssetImporter.GetAtPath(以 Assets/ 开头的工程内路径) as TextureImporter取到该图的导入器。textureCompression = Uncompressed:数据贴图关压缩。filterMode = FilterMode.Point:点采样,避免线性过滤混邻像素。mipmapEnabled = false。sRGBTexture = false:不按 sRGB 颜色纹理处理。SaveAndReimport():落盘配置并触发重新导入。
主要步骤
- 按行扫描顺序(示例用
nowPixelIndex换算x、y)把归一化后的分量SetPixel进纹理,再Apply、EncodeToPNG、WriteAllBytes。 AssetDatabase.Refresh()后GetAtPath取TextureImporter,按上文「二」的第 2~6 步配齐并保存。
下面示例与工程里 Lesson_补充知识 流程一致:前半段仍是第 4~6 篇的取 Clip、烘焙、扫 min/max;从 new Texture2D 起是本节重点。SetPixel 里 RGB 存的是归一化后的顶点 x、y、z,A 写 1 仅占位。
using System.IO;
using UnityEditor;
using UnityEditor.Animations;
using UnityEngine;

// —— 以下与第 4~6 篇相同:取状态数组、蒙皮、扫 min/max ——

//主要目的:
//获取某个对象的所有使用的AnimationClip信息
//这样就能得到所有动画的关键信息

//主要思路:
//通过获取Animator动画状态机中的状态
//从而得到动画信息,因为状态的本质就是动画

//主要步骤:

//1.得到目标GameObject
//(由外部 targetGameObject 传入)

//2.得到GameObject上的Animator组件
Animator animator = targetGameObject.GetComponent<Animator>();
if (animator == null)
{
    return;
}

//3.通过Animator组件得到AnimatorController
AnimatorController animatorController = animator.runtimeAnimatorController as AnimatorController;
if (animatorController == null)
{
    return;
}

//4.得到AnimatorController中对应层的状态机AnimatorStateMachine
AnimatorStateMachine animatorStateMachine = animatorController.layers[0].stateMachine;

//5.得到状态机中的所有状态ChildAnimatorState[]数组
ChildAnimatorState[] childAnimatorStateArray = animatorStateMachine.states;

//6.遍历该数组
//  其中每个状态的motion就是对应的动画切片AnimationClip
//  这样我们就能得到帧率、时长等关键信息

//之所以绕一圈去获取动画切片 是为了之后做铺垫
//我们可以结合Animator,蒙皮网格渲染器,利用他们一起去得到某一个动画某一帧对应的顶点数据

// 拿到SkinnedMeshRenderer和创建Mesh
SkinnedMeshRenderer skinnedMeshRenderer = targetGameObject.GetComponentInChildren<SkinnedMeshRenderer>();
if (skinnedMeshRenderer == null)
{
    return;
}

Mesh mesh = new Mesh();

//用于存储顶点最大最小值的变量
int min = int.MaxValue;
int max = int.MinValue;

for (int i = 0; i < childAnimatorStateArray.Length; i++)
{
    AnimatorState animatorState = childAnimatorStateArray[i].state;
    AnimationClip animationClip = animatorState.motion as AnimationClip;

    // animationClip.frameRate 帧率
    // animationClip.length 时长
    int frameCount = Mathf.CeilToInt(animationClip.frameRate * animationClip.length); //得到这个clip多少帧

    //需要把每一帧对应的时间点传递进去 => 帧数转时间 帧数/帧率
    for (int j = 0; j < frameCount; j++)
    {
        //一帧一帧的得到对应的顶点数据 存储到VAT中
        //让对象定格到了某一帧
        animationClip.SampleAnimation(targetGameObject, j / animationClip.frameRate);

        //得到当前帧的顶点信息
        //每次烘焙时把上一次的数据清理了
        mesh.Clear(false);

        //得到了此时此刻的网格相关的数据
        skinnedMeshRenderer.BakeMesh(mesh);

        //得到了此时此刻网格对应的所有顶点位置
        // 获取网格的顶点数组:每个顶点存储了三维空间中的坐标(x,y,z)
        Vector3[] vertices = mesh.vertices;
        // 获取网格的法线数组:每个顶点的法线方向,用于计算光照效果
        Vector3[] normals = mesh.normals;
        // 获取网格的切线数组:用于法线贴图(凹凸贴图)的计算,是四维向量(x,y,z,w),w 用于控制切线方向
        Vector4[] tangents = mesh.tangents;

        //我们需要遍历所有动画切片的所有帧的网格顶点位置
        //从而找到最大最小值 才能进行归一化计算
        //帧数 * 顶点数
        //(57+50+20)* 9500
        // 遍历网格的所有顶点,计算顶点坐标的最小/最大整数值
        for (int k = 0; k < vertices.Length; k++)
        {
            // 获取当前遍历到的顶点的三维坐标(x,y,z)
            Vector3 vertice = vertices[k];

            // 1. 更新最小值:
            // - 对比当前min值、顶点x/y/z坐标,取其中最小的数值
            // - Mathf.FloorToInt:向下取整(比如 2.9 → 2,-1.2 → -2),确保得到整数边界
            min = Mathf.FloorToInt(Mathf.Min(min, vertice.x, vertice.y, vertice.z));

            // 2. 更新最大值:
            // - 对比当前max值、顶点x/y/z坐标,取其中最大的数值
            // - Mathf.CeilToInt:向上取整(比如 2.1 → 3,-1.9 → -1),确保得到整数边界
            max = Mathf.CeilToInt(Mathf.Max(max, vertice.x, vertice.y, vertice.z));
        }
    }
}

Debug.Log("顶点坐标最小值" + min);
Debug.Log("顶点坐标最大值" + max);

// —— 本节:写入纹理并配置导入 ——

// 创建一个2048x2048尺寸的纹理对象
// 参数说明:
// - 2048, 2048:纹理的宽度和高度(像素)
// - TextureFormat.RGBA32:纹理格式为RGBA32(每个像素占4字节,红/绿/蓝/透明度各8位)
// - false:不生成多级渐远纹理(mipmap),减少内存占用且提升创建速度
// - true:线性空间;数据贴图用 true,避免当 sRGB 颜色纹理做伽马校正
Texture2D texture2D = new Texture2D(2048, 2048, TextureFormat.RGBA32, false, true);

// 像素遍历索引:用于逐像素填充纹理数据时的计数
// 初始值0表示从纹理的第一个像素(左上角,索引0)开始填充
int nowPixelIndex = 0;

for (int i = 0; i < childAnimatorStateArray.Length; i++)
{
    AnimatorState animatorState = childAnimatorStateArray[i].state;
    AnimationClip animationClip = animatorState.motion as AnimationClip;
    int frameCount = Mathf.CeilToInt(animationClip.length * animationClip.frameRate);

    //需要把每一帧对应的时间点传递进去 => 帧数转时间 帧数/帧率
    for (int j = 0; j < frameCount; j++)
    {
        //一帧一帧的得到对应的顶点数据 存储到VAT中
        //让对象定格到了某一帧
        animationClip.SampleAnimation(targetGameObject, j / animationClip.frameRate);
        //得到当前帧的顶点信息
        //每次烘焙时把上一次的数据清理了
        mesh.Clear(false);
        //得到了此时此刻的网格相关的数据
        skinnedMeshRenderer.BakeMesh(mesh);
        //得到了此时此刻网格对应的所有顶点位置
        Vector3[] vertices = mesh.vertices;
        Vector3[] normals = mesh.normals;
        Vector4[] tangents = mesh.tangents;

        //我们需要遍历所有动画切片的所有帧的网格顶点位置
        //从而找到最大最小值 才能进行归一化计算
        //帧数 * 顶点数
        //(57+50+20)* 9500
        for (int k = 0; k < vertices.Length; k++)
        {
            // 获取当前索引k对应的顶点三维坐标(x/y/z)
            Vector3 vertice = vertices[k];

            // 将顶点的三维坐标从 [min, max] 范围归一化到 [0, 1] 区间(核心:逆线性插值)
            // 归一化后的坐标存储到 normalVertice,用于后续颜色映射/纹理绘制等操作
            Vector3 normalVertice = new Vector3(
                Mathf.InverseLerp(min, max, vertice.x), // 对顶点x坐标做归一化
                Mathf.InverseLerp(min, max, vertice.y), // 对顶点y坐标做归一化
                Mathf.InverseLerp(min, max, vertice.z) // 对顶点z坐标做归一化
            );

            // 通过当前像素索引计算纹理上的二维坐标(纹理尺寸为2048x2048)
            // 纹理坐标规则:
            // - X轴:索引对宽度取余,范围 0~2047(从左到右)
            // - Y轴:索引除以宽度取整,范围 0~2047(从上到下,Unity纹理默认Y轴向下)
            int x = nowPixelIndex % 2048;
            int y = nowPixelIndex / 2048;

            // 给纹理的(x,y)坐标设置像素颜色
            // 颜色值说明(此处为数据打包,非美术上色):
            // - R:归一化后的顶点 x(normalVertice.x)
            // - G:归一化后的顶点 y(normalVertice.y)
            // - B:归一化后的顶点 z(normalVertice.z)
            // - A:固定为 1,占位
            texture2D.SetPixel(x, y, new Color(normalVertice.x, normalVertice.y, normalVertice.z, 1));

            // 像素索引自增,准备处理下一个像素
            ++nowPixelIndex;
        }
    }
}

// 循环结束后 像素存储完毕了
// 应用纹理像素修改(将内存中的像素数据写入纹理资源)
// 参数说明:
// - false:不生成mipmap(法线纹理/数据纹理无需多级渐远)
// - false:不保留像素数据在内存中(节省内存,导出后无需再修改像素)
texture2D.Apply(false, false);

// 将纹理编码为PNG格式并写入指定路径
// Application.dataPath:Unity工程的Assets文件夹绝对路径
// 路径说明:Assets/Art/VAT/test.png(工程内相对路径,方便后续导入配置)
File.WriteAllBytes(Application.dataPath + "/Art/VAT/test.png", texture2D.EncodeToPNG());

// 刷新AssetDatabase,让Unity识别新创建的PNG文件(否则后续无法获取TextureImporter)
AssetDatabase.Refresh();

// 纹理生成完毕了 对它进行一劳永逸的基础设置
// 获取PNG文件的TextureImporter(用于配置纹理导入参数)
// 注意:路径必须是工程内相对路径(Assets/开头),不能用绝对路径
TextureImporter textureImporter = AssetImporter.GetAtPath("Assets/Art/VAT/test.png") as TextureImporter;

// ========== 针对数据纹理(法线/VAT)的核心配置 ==========
// 1. 关闭纹理压缩(关键!数据纹理压缩会丢失精度,导致法线/VAT数据错误)
textureImporter.textureCompression = TextureImporterCompression.Uncompressed;

// 2. 设置过滤模式为点过滤(Point):避免纹理采样时的线性插值,保证数据精准
//    (线性过滤会混合相邻像素,破坏法线/坐标等精准数据)
textureImporter.filterMode = FilterMode.Point;

// 3. 关闭mipmap生成(数据纹理不需要缩放显示,节省内存+避免mipmap采样误差)
textureImporter.mipmapEnabled = false;

// 4. 关闭sRGB色彩空间(关键!法线/VAT是数据纹理,非颜色纹理,无需伽马校正)
//    sRGB开启会导致颜色值非线性转换,破坏原始数据
textureImporter.sRGBTexture = false;

// 保存导入设置并重新导入纹理(使上述配置生效)
textureImporter.SaveAndReimport();
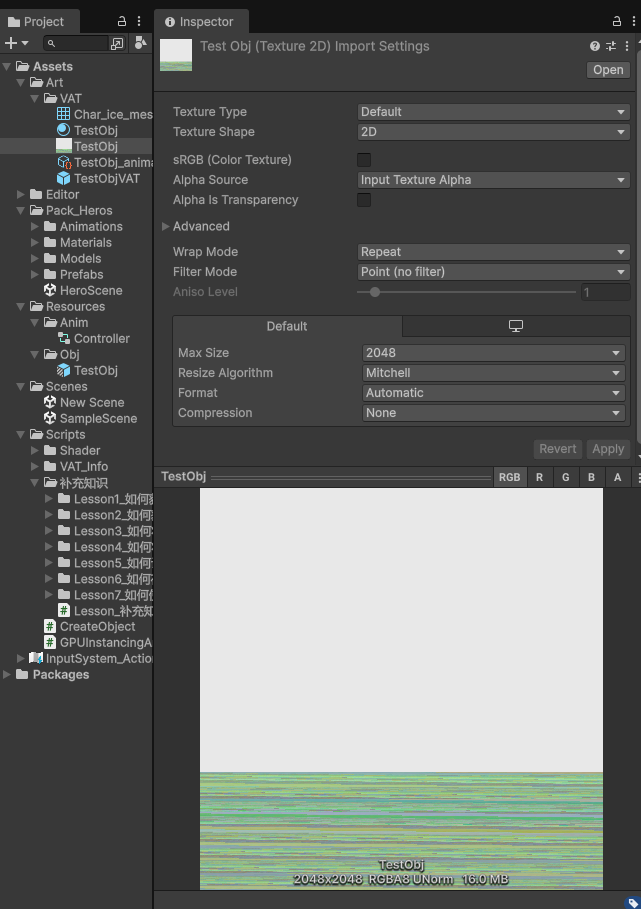
SaveAndReimport() 执行完后,在 Project 里选中导出的 VAT 贴图(下图为课程资源 Assets/Art/VAT 下的 TestObj,与你脚本里的 test.png 同类),Inspector 里应对得上前面的代码:sRGB Texture 关闭、Filter Mode 为 Point、Compression 为 None、mipmap 关闭。预览里下半截看起来像彩色噪点,实质是按行写入的归一化顶点分量(RGB 当数据用)。
写入前请确保 Assets/Art/VAT/ 目录存在;nowPixelIndex 超过 宽×高 会越界,实际工具里要按总顶点数×总帧数算好纹理尺寸或改分页策略。
7.2 知识点代码
WriteVatTextureExample.cs
using System.IO;
using UnityEditor;
using UnityEditor.Animations;
using UnityEngine;

// 将本脚本放在 Editor 目录;示例为菜单或窗口调用,勿挂在会打进包体的运行时脚本里

public static class WriteVatTextureExample
{
    public static void BuildVatPng(GameObject targetGameObject)
    {
        if (targetGameObject == null)
        {
            return;
        }

        //主要目的:
        //将获取到的顶点位置信息依次存储到一张纹理图片中
        //完成我们VAT的生成

        //主要思路:
        //1.利用Texture2D类对象,将颜色信息写入其中
        //  再将其保存到本地
        //  主要API:
        //  1-1.Texture2D tex = new Texture2D(宽, 高, 格式, 是否生成mipmap, 是否为线性空间);
        //      格式:常用的有 RGBA32、RGBAHalf、RGBAFloat、R8、RG16,一般我们使用RGBA32即可
        //      是否生成mipmap:如果为true,会有1/2、1/4 等等缩小的多级版本,VAT不需要开启
        //      是否为线性空间:这张纹理的颜色数值要不要进行 sRGB和Linear 的色彩空间转换
        //                    如果为true,代表为linear空间,对于数据贴图我们一般传true,不需要做伽玛校正
        //  1-2.利用Texture2D中的设置颜色的方法,将颜色信息写入对应位置
        //      tex.SetPixel(x, y, color)
        //  1-3.把你在 CPU 端对纹理像素做的修改(SetPixel/SetPixels/RawData 等)提交、上传到 GPU
        //      tex.Apply(是否计算mipmap,是否释放CPU端像素数据)
        //      如果你只 SetPixel 不 Apply,你改动通常只停留在内存里,屏幕上看不到变化
        //  1-4.将纹理数据转换为字节数组
        //      tex.EncodeToPNG()
        //  1-5.将纹理的字节数组存储到本地磁盘
        //      File.WriteAllBytes
        //2.设置纹理相关设置
        //  利用TextureImporter设置图片资源导入的配置相关信息
        //  2-1.得到对应图片导入设置信息
        //      TextureImporter textureImporter = AssetImporter.GetAtPath(图片路径) as TextureImporter;
        //  2-2.将纹理设置为不压缩
        //      textureImporter.textureCompression = TextureImporterCompression.Uncompressed;
        //  2-3.设置过滤模式
        //      textureImporter.filterMode = FilterMode.Point;
        //  2-4.关闭mipmap
        //      textureImporter.mipmapEnabled = false;
        //  2-5.关闭伽马空间颜色,因为VAT是数据纹理,不需要伽马空间校正
        //      textureImporter.sRGBTexture = false;
        //  2-6.保存设置
        //      textureImporter.SaveAndReimport();

        //主要步骤:
        //1.将获取到的顶点数据利用相关API存储到纹理中并保存到本地
        //2.修改该纹理的相关设置

        // —— 第 4~6 篇:取 Clip、烘焙、min/max;注释与课程 Lesson_补充知识 一致 ——

        //主要目的:
        //获取某个对象的所有使用的AnimationClip信息
        //这样就能得到所有动画的关键信息

        //主要思路:
        //通过获取Animator动画状态机中的状态
        //从而得到动画信息,因为状态的本质就是动画

        //主要步骤:

        //1.得到目标GameObject

        //2.得到GameObject上的Animator组件
        Animator animator = targetGameObject.GetComponent<Animator>();
        if (animator == null)
        {
            return;
        }

        //3.通过Animator组件得到AnimatorController
        AnimatorController animatorController = animator.runtimeAnimatorController as AnimatorController;
        if (animatorController == null)
        {
            return;
        }

        //4.得到AnimatorController中对应层的状态机AnimatorStateMachine
        AnimatorStateMachine animatorStateMachine = animatorController.layers[0].stateMachine;

        //5.得到状态机中的所有状态ChildAnimatorState[]数组
        ChildAnimatorState[] childAnimatorStateArray = animatorStateMachine.states;

        //6.遍历该数组
        //  其中每个状态的motion就是对应的动画切片AnimationClip
        //  这样我们就能得到帧率、时长等关键信息

        //之所以绕一圈去获取动画切片 是为了之后做铺垫
        //我们可以结合Animator,蒙皮网格渲染器,利用他们一起去得到某一个动画某一帧对应的顶点数据

        // 拿到SkinnedMeshRenderer和创建Mesh
        SkinnedMeshRenderer skinnedMeshRenderer = targetGameObject.GetComponentInChildren<SkinnedMeshRenderer>();
        if (skinnedMeshRenderer == null)
        {
            return;
        }

        Mesh mesh = new Mesh();

        //用于存储顶点最大最小值的变量
        int min = int.MaxValue;
        int max = int.MinValue;

        for (int i = 0; i < childAnimatorStateArray.Length; i++)
        {
            AnimatorState animatorState = childAnimatorStateArray[i].state;
            AnimationClip animationClip = animatorState.motion as AnimationClip;
            if (animationClip == null)
            {
                continue;
            }

            // animationClip.frameRate 帧率
            // animationClip.length 时长
            int frameCount = Mathf.CeilToInt(animationClip.frameRate * animationClip.length); //得到这个clip多少帧

            //需要把每一帧对应的时间点传递进去 => 帧数转时间 帧数/帧率
            for (int j = 0; j < frameCount; j++)
            {
                //一帧一帧的得到对应的顶点数据 存储到VAT中
                //让对象定格到了某一帧
                animationClip.SampleAnimation(targetGameObject, j / animationClip.frameRate);

                //得到当前帧的顶点信息
                //每次烘焙时把上一次的数据清理了
                mesh.Clear(false);

                //得到了此时此刻的网格相关的数据
                skinnedMeshRenderer.BakeMesh(mesh);

                //得到了此时此刻网格对应的所有顶点位置
                // 获取网格的顶点数组:每个顶点存储了三维空间中的坐标(x,y,z)
                Vector3[] vertices = mesh.vertices;
                // 获取网格的法线数组:每个顶点的法线方向,用于计算光照效果
                Vector3[] normals = mesh.normals;
                // 获取网格的切线数组:用于法线贴图(凹凸贴图)的计算,是四维向量(x,y,z,w),w 用于控制切线方向
                Vector4[] tangents = mesh.tangents;

                //我们需要遍历所有动画切片的所有帧的网格顶点位置
                //从而找到最大最小值 才能进行归一化计算
                //帧数 * 顶点数
                //(57+50+20)* 9500
                // 遍历网格的所有顶点,计算顶点坐标的最小/最大整数值
                for (int k = 0; k < vertices.Length; k++)
                {
                    // 获取当前遍历到的顶点的三维坐标(x,y,z)
                    Vector3 vertice = vertices[k];

                    // 1. 更新最小值:
                    // - 对比当前min值、顶点x/y/z坐标,取其中最小的数值
                    // - Mathf.FloorToInt:向下取整(比如 2.9 → 2,-1.2 → -2),确保得到整数边界
                    min = Mathf.FloorToInt(Mathf.Min(min, vertice.x, vertice.y, vertice.z));

                    // 2. 更新最大值:
                    // - 对比当前max值、顶点x/y/z坐标,取其中最大的数值
                    // - Mathf.CeilToInt:向上取整(比如 2.1 → 3,-1.9 → -1),确保得到整数边界
                    max = Mathf.CeilToInt(Mathf.Max(max, vertice.x, vertice.y, vertice.z));
                }
            }
        }

        Debug.Log("顶点坐标最小值" + min);
        Debug.Log("顶点坐标最大值" + max);

        // 创建一个2048x2048尺寸的纹理对象
        // 参数说明:
        // - 2048, 2048:纹理的宽度和高度(像素)
        // - TextureFormat.RGBA32:纹理格式为RGBA32(每个像素占4字节,红/绿/蓝/透明度各8位)
        // - false:不生成多级渐远纹理(mipmap),减少内存占用且提升创建速度
        // - true:纹理采用线性颜色空间(用于PBR/高质量渲染,若为2D UI可设为false)
        Texture2D texture2D = new Texture2D(2048, 2048, TextureFormat.RGBA32, false, true);

        // 像素遍历索引:用于逐像素填充纹理数据时的计数
        // 初始值0表示从纹理的第一个像素(左上角,索引0)开始填充
        int nowPixelIndex = 0;

        for (int i = 0; i < childAnimatorStateArray.Length; i++)
        {
            AnimatorState animatorState = childAnimatorStateArray[i].state;
            AnimationClip animationClip = animatorState.motion as AnimationClip;
            if (animationClip == null)
            {
                continue;
            }

            int frameCount = Mathf.CeilToInt(animationClip.length * animationClip.frameRate);

            //需要把每一帧对应的时间点传递进去 => 帧数转时间 帧数/帧率
            for (int j = 0; j < frameCount; j++)
            {
                //一帧一帧的得到对应的顶点数据 存储到VAT中
                //让对象定格到了某一帧
                animationClip.SampleAnimation(targetGameObject, j / animationClip.frameRate);
                //得到当前帧的顶点信息
                //每次烘焙时把上一次的数据清理了
                mesh.Clear(false);
                //得到了此时此刻的网格相关的数据
                skinnedMeshRenderer.BakeMesh(mesh);
                //得到了此时此刻网格对应的所有顶点位置
                Vector3[] vertices = mesh.vertices;
                Vector3[] normals = mesh.normals;
                Vector4[] tangents = mesh.tangents;

                //我们需要遍历所有动画切片的所有帧的网格顶点位置
                //从而找到最大最小值 才能进行归一化计算
                //帧数 * 顶点数
                //(57+50+20)* 9500
                for (int k = 0; k < vertices.Length; k++)
                {
                    // 获取当前索引k对应的顶点三维坐标(x/y/z)
                    Vector3 vertice = vertices[k];

                    // 将顶点的三维坐标从 [min, max] 范围归一化到 [0, 1] 区间(核心:逆线性插值)
                    // 归一化后的坐标存储到 normalVertice,用于后续颜色映射/纹理绘制等操作
                    Vector3 normalVertice = new Vector3(
                        Mathf.InverseLerp(min, max, vertice.x), // 对顶点x坐标做归一化
                        Mathf.InverseLerp(min, max, vertice.y), // 对顶点y坐标做归一化
                        Mathf.InverseLerp(min, max, vertice.z) // 对顶点z坐标做归一化
                    );

                    // 通过当前像素索引计算纹理上的二维坐标(纹理尺寸为2048x2048)
                    // 纹理坐标规则:
                    // - X轴:索引对宽度取余,范围 0~2047(从左到右)
                    // - Y轴:索引除以宽度取整,范围 0~2047(从上到下,Unity纹理默认Y轴向下)
                    int x = nowPixelIndex % 2048;
                    int y = nowPixelIndex / 2048;

                    // 给纹理的(x,y)坐标设置像素颜色
                    // 颜色值说明(此处为数据打包,非美术上色):
                    // - R:归一化后的顶点 x(normalVertice.x)
                    // - G:归一化后的顶点 y(normalVertice.y)
                    // - B:归一化后的顶点 z(normalVertice.z)
                    // - A:固定为 1,占位
                    texture2D.SetPixel(x, y, new Color(normalVertice.x, normalVertice.y, normalVertice.z, 1));

                    // 像素索引自增,准备处理下一个像素
                    ++nowPixelIndex;
                }
            }
        }

        // 循环结束后 像素存储完毕了
        // 应用纹理像素修改(将内存中的像素数据写入纹理资源)
        // 参数说明:
        // - false:不生成mipmap(法线纹理/数据纹理无需多级渐远)
        // - false:不保留像素数据在内存中(节省内存,导出后无需再修改像素)
        texture2D.Apply(false, false);

        // 将纹理编码为PNG格式并写入指定路径
        // Application.dataPath:Unity工程的Assets文件夹绝对路径
        // 路径说明:Assets/Art/VAT/test.png(工程内相对路径,方便后续导入配置)
        File.WriteAllBytes(Application.dataPath + "/Art/VAT/test.png", texture2D.EncodeToPNG());

        // 刷新AssetDatabase,让Unity识别新创建的PNG文件(否则后续无法获取TextureImporter)
        AssetDatabase.Refresh();

        // 纹理生成完毕了 对它进行一劳永逸的基础设置
        // 获取PNG文件的TextureImporter(用于配置纹理导入参数)
        // 注意:路径必须是工程内相对路径(Assets/开头),不能用绝对路径
        TextureImporter textureImporter = AssetImporter.GetAtPath("Assets/Art/VAT/test.png") as TextureImporter;

        // ========== 针对数据纹理(法线/VAT)的核心配置 ==========
        // 1. 关闭纹理压缩(关键!数据纹理压缩会丢失精度,导致法线/VAT数据错误)
        textureImporter.textureCompression = TextureImporterCompression.Uncompressed;

        // 2. 设置过滤模式为点过滤(Point):避免纹理采样时的线性插值,保证数据精准
        //    (线性过滤会混合相邻像素,破坏法线/坐标等精准数据)
        textureImporter.filterMode = FilterMode.Point;

        // 3. 关闭mipmap生成(数据纹理不需要缩放显示,节省内存+避免mipmap采样误差)
        textureImporter.mipmapEnabled = false;

        // 4. 关闭sRGB色彩空间(关键!法线/VAT是数据纹理,非颜色纹理,无需伽马校正)
        //    sRGB开启会导致颜色值非线性转换,破坏原始数据
        textureImporter.sRGBTexture = false;

        // 保存导入设置并重新导入纹理(使上述配置生效)
        textureImporter.SaveAndReimport();
    }
}
转载请注明来源,欢迎对文章中的引用来源进行考证,欢迎指出任何有错误或不够清晰的表达。可以在下面评论区评论,也可以邮件至 785293209@qq.com

